
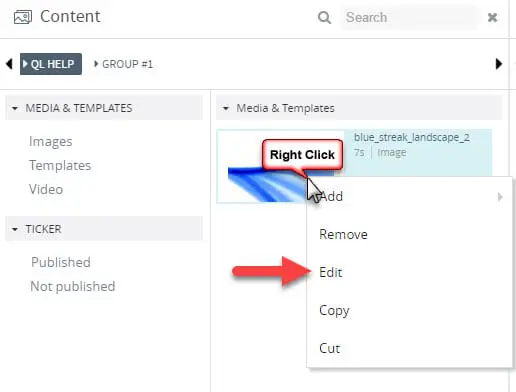
There are two ways to access the media properties.
1. Right-click on the media in the right pane of the Content window. Select Edit.
2. Double-click on any media in the right pane of the Content window to access the Media Properties directly.
The media properties window is where you can set various playback options and change how some content behaves.
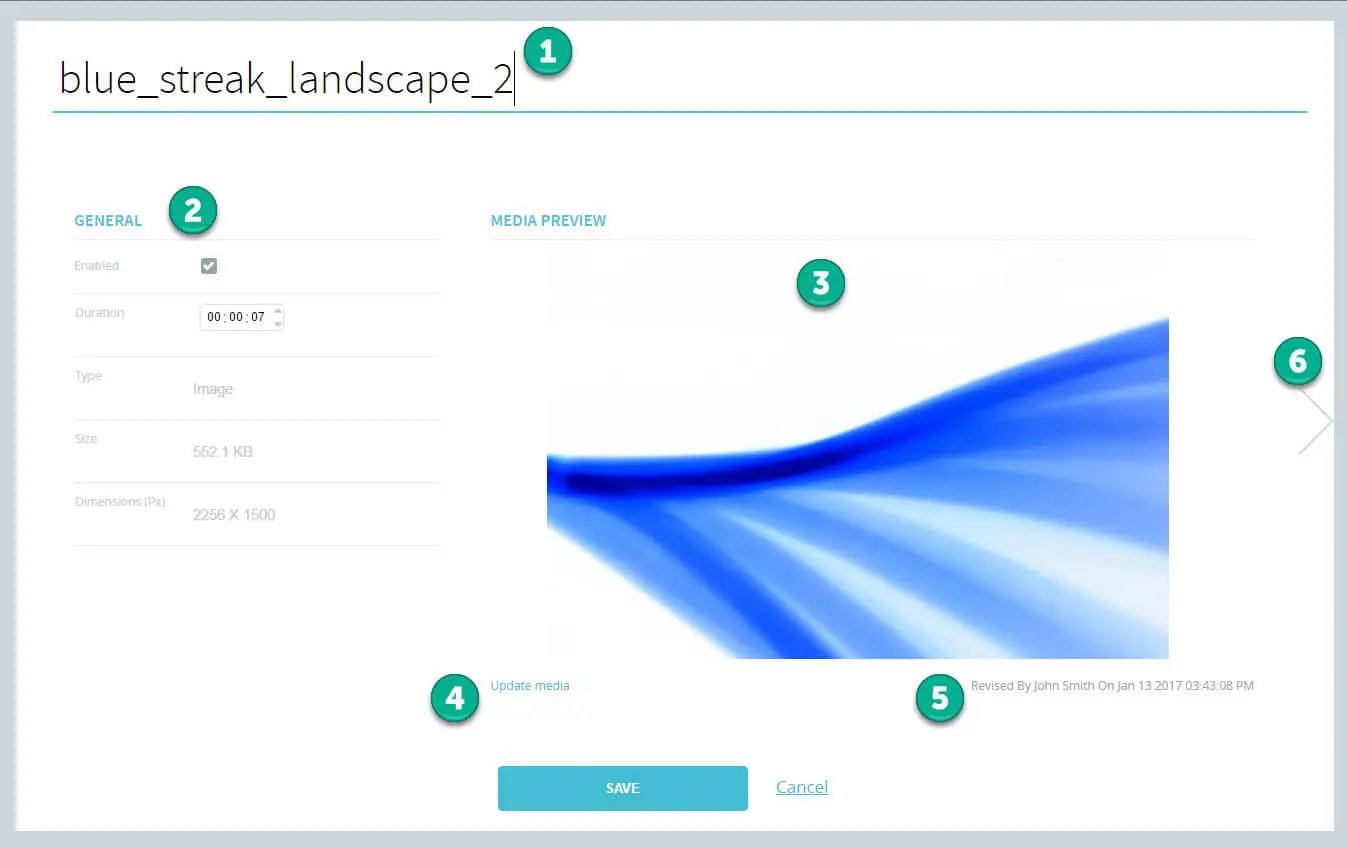
1. Media Name: This is the descriptive name for this content. By default, this will be the name of the original file and it can be edited directly in the media properties window. Click on the name to edit. Click the Save button to confirm your changes.
2. General Settings:
- Enabled: When selected, means the content is playable. Unless user is not authorized, this option is preselected. All new content is enabled by default. Deselect this option to temporarily disable content from playing, NOTE: Users who must get their content approved by a manager cannot select this option. For these users, this option will be completely disabled and unselectable.
- Duration: The default duration for all images is 7 seconds. Still image duration can be changed by the user. Video content duration is automatically detected by the system. Web page and streaming video duration is set to 15 seconds by default. This duration can also be modified by the user.
- Type: Shows the type of content currently selected. This field cannot be edited.
- Size: Shows the size of the data file.
- Dimensions: Shows the size of the media in pixels.
- Total bit rate (bits per second): number of bits per second (video only)
- Frame rate: The number of frames per second (video only)
3. Media Preview Window
Content can be previewed in the window (note: video can also be previewed fullscreen).
Video controls are visible under the preview window.

4. Update media: Users can switch the file associated with any content. This is to prevent having to create a new media item each time the file is updated. Once a media file has been uploaded to the server, users can click the Update media link to bring up a Windows Explorer window so they can select the updated file. All previous media properties are retained.
5. Revised by: Each interaction with content is recorded by the system. The user name, date and time is always visible in the media properties window. Initially, the media upload date and time are recorded and this information is updated each time someone modifies a setting.
6. Next page: Click to switch to the advanced settings.
Advanced Settings Page 1
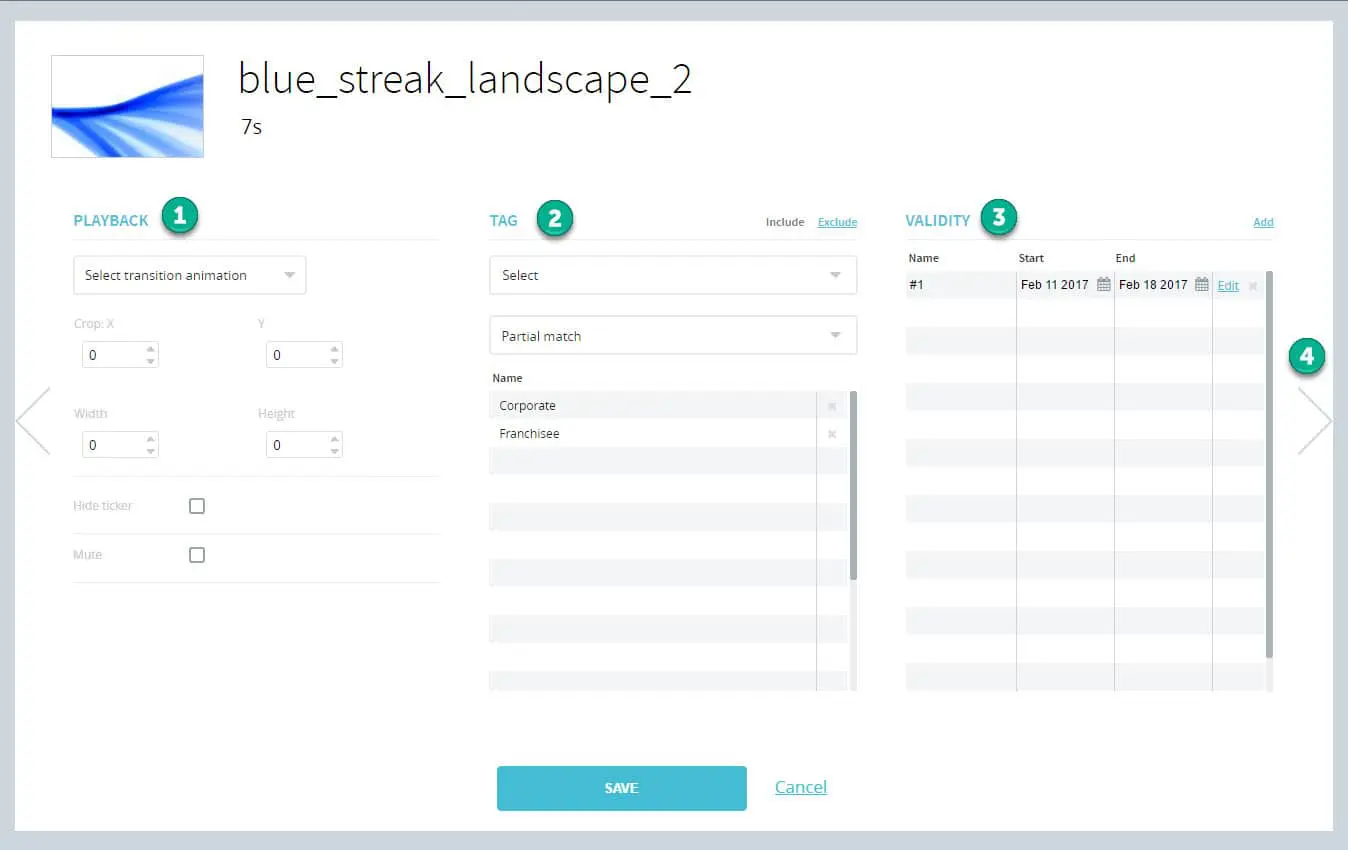
1. Playback Options: This is where you set various options such as transition effects, cropping values, etc… The options change depending on the type of media that you are working with.
IMAGES ONLY
- Transition animations: Select from one of 11 image transition options. Note that the default setting is no transition animation.
VIDEOS ONLY
- Start on frame: Select the frame on which you wish the video to begin playback.
- End frame: Select the frame on which you wish the video to stop playback.
IMAGE / VIDEO / URL / VIDEO STREAM / TV FEED
- Cropping: Enter X, Y, Width and Height values to isolate the area of image you wish to display. The origin point is the upper left corner of the screen (coordinates 0,0). Positive X values move the cropping box to the right. Positive Y values move the cropping box towards the bottom. For example, coordinates X=25, Y=25 move the dropping box 25 pixels to the right of the left edge of the screen and 25 pixels from the top edge of the screen. The Width and Height values define the area of the image that will be shown. For example, Width = 1920, Height = 720 will define a 720p window. Assuming the image is larger than this area, only 1920×720 pixels of the image will be shown.
- Hide ticker: Selecting this option will remove the ticker for the duration of the media.
- Mute: Selecting this option will silence the audio track.
2. Tagging: Meta tags can be assigned to players and content. When meta tags match, the content will either play or be excluded from players with matching tag(s). More than one meta tag can be assigned at a time. When there are more than one meta tag, users can choose if all the tags or only one of the assigned tags must be present (partial or exclusive match). Otherwise the content will not play. Tags are assigned to players first and then users are able to select them from the pull down menu. Once selected, meta tags will appear in the list below. The second pull down menu is used to select if a partial or exclusive match is required for the content to play. The default behavior is set to include tagged content for playback. Selecting the exclude option will have the opposite effect. Tagged content will not be shown on players that have been assigned matching tag(s).
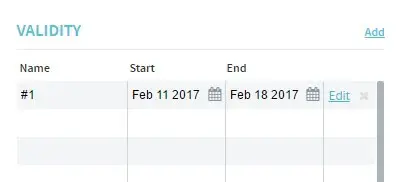
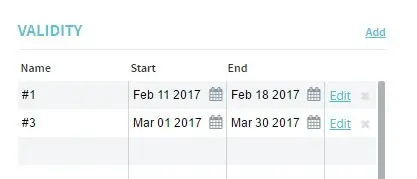
3. Validity: By default, all content is deemed to be valid, meaning it will play when placed into a scheduled playlist. The validity option can be invoked when a user wants to preload content in advance and set a future day and time when the content will be shown. The first step it to click the Add link and then a validity period will appear in the table below. An editable default name will automatically be assigned to each new validity period. Next are the start and end dates. Users can edit the dates in the table or click on the calendar symbol to select them. Once a validity period has been assigned, content must be added to a scheduled playlist. From this point, the content will only be shown on screen during its programmed validity period. If the content is added to a playlist currently scheduled and it’s validity period begins in a month, it will not be shown until it’s validity start date. If it is left in the scheduled playlist past it’s expiry date, it will automatically stop playing. The playlist will ignore expired content. To restore the content, users can either remove the validity period or extend the expiry date beyond the current day.
Users can create one or more validity periods. For example, users can create multiple validity periods so the content only plays the first week of every month. There are an infinite number of scenarios that can be programmed using validity periods.
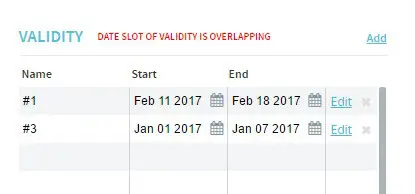
Validity periods must follow each other. Validity periods cannot overlap but if they do, an error message will be displayed and you will need to edit the overlapping period, or delete it entirely. To delete a validity period, click the X at the end of the line.
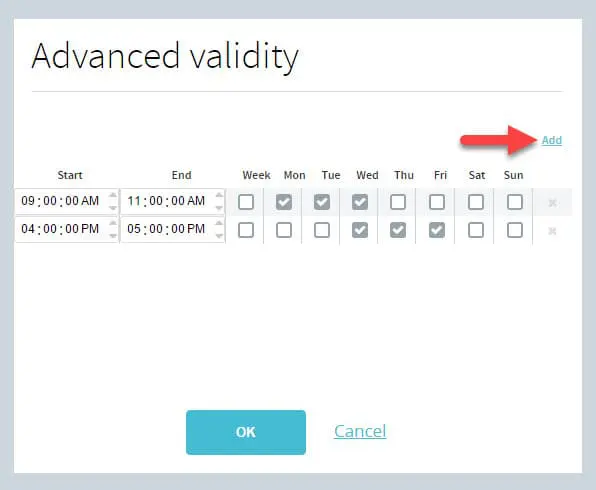
Users are not limited to programming days. Once a validity period has been programmed, users can click the Edit link in the right column to access advanced options. In this mode, users can pick specific days of the week or even time periods where content will be shown. This is above and beyond the basic settings. For example, users can create a validity period that covers an entire month and then specify the content can only be shown on monday, tuesday and wednesday between 9 AM and 11 AM. Perhaps you also want the same content to be playable on Wednesday, Thursday and Friday between 4 PM and 5 PM. Simply enter each block of time and click the Add link to add more periods.
Once all the settings have been recorded, be sure to add this content to a scheduled playlist. If this playlist is scheduled all day, every day, the content will only show up on screen during it’s validity settings. Once the expiry date has passed, the content will no longer be shown on screen, even if it remains in a scheduled playlist.
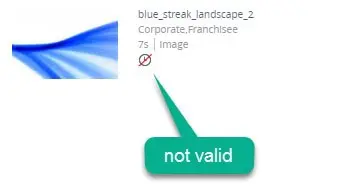
Content that has been assigned a validity period will show a symbol in the content library, next to its thumbnail. The symbol will change to indicate if the content is currently valid, or outside its validity period (can be before or after). In the example below, the clock symbol with a red band indicates this content is either not yet valid, or expired.
Advanced Settings Page 2
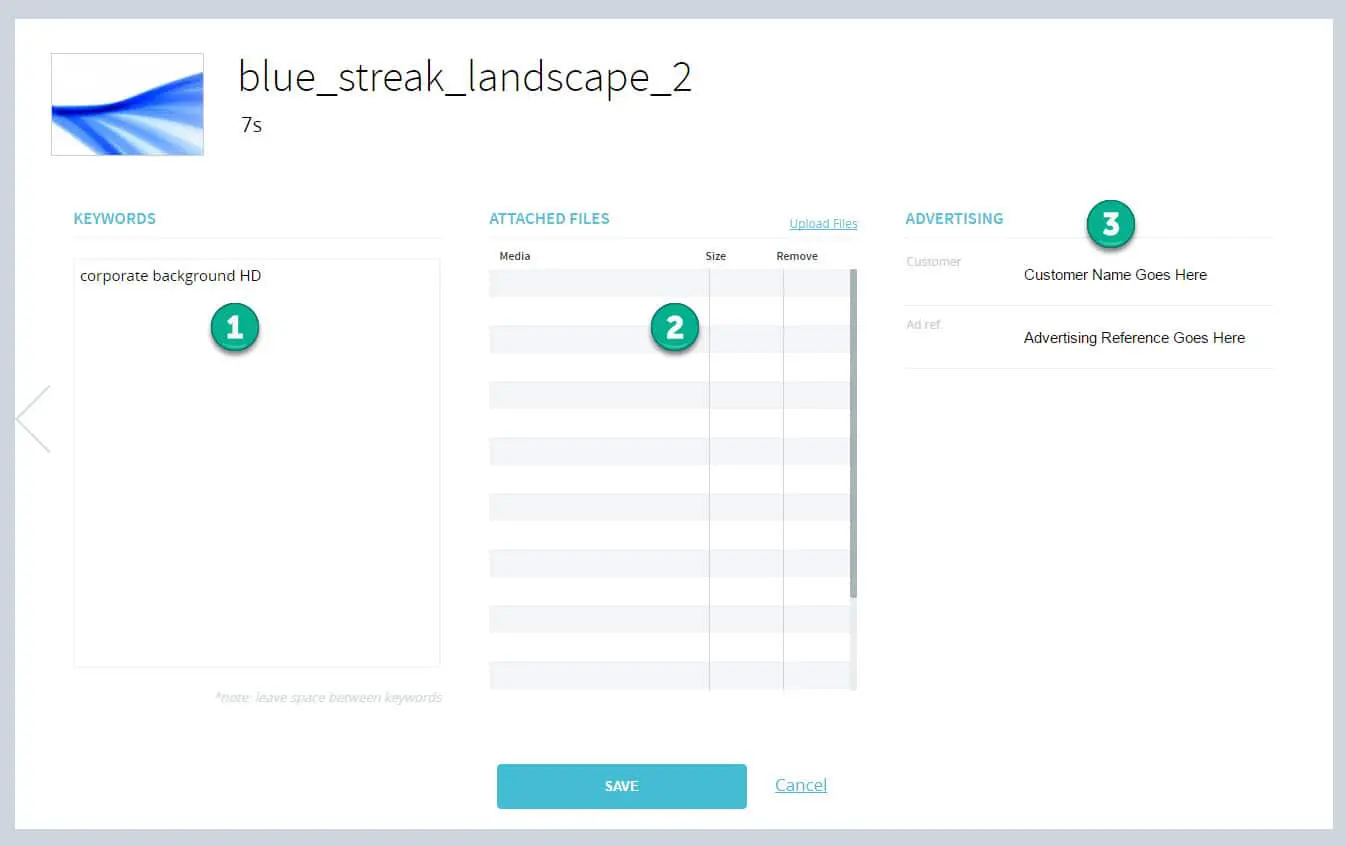
1. Keywords: This field is empty by default. To add keywords, click in the field and start typing. To enter multiple keywords, leave a space between each word. Don’t use any colons or semicolons between keywords.
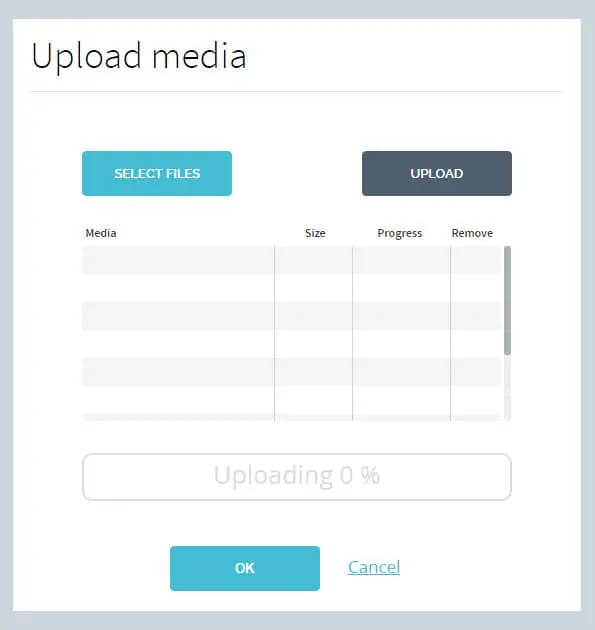
2. Attached Files: Users can attach external files to the currently selected content. For example, you may need to associate some images or XML data to a Adobe Flash SWF file. This is where you go to upload these files. All attached files are sent to players with the content.
To add attachments, click the Upload Files link. This will open the Upload media window. Click Select Files to pick the files you wish to add. Click Upload to send the files to the server. A progress bar will appear during the file transfer process and you will be notified when all files have been uploaded.
3. Advertising: Users can associate metadata with every content. This information is entered in the Customer and Ad ref. fields.
Note: These fields are alphanumeric.
Both advertising fields can also be used for other applications. For example a company could enter an employee name as Customer, or a department reference instead of advertising reference. The contents of these fields are used to sort the results in proof of playback reports so you can use these fields for non advertising applications.